 I was REALLY pleased with how this guy came out. Especially his blanket.
 Here is a group shot. We just finished moving into a new house so hopefully this week I'll be able to jump back into painting and get this regiment finished.
I was REALLY pleased with how this guy came out. Especially his blanket.Here is a group shot. We just finished moving into a new house so hopefully this week I'll be able to jump back into painting and get this regiment finished.
Here is a group shot. We just finished moving into a new house so hopefully this week I'll be able to jump back into painting and get this regiment finished.
I was REALLY pleased with how this guy came out. Especially his blanket.Here is a group shot. We just finished moving into a new house so hopefully this week I'll be able to jump back into painting and get this regiment finished.
 This is my 2nd cousin 3 times removed (or my Great-Great-Grandfather's Cousin). William Henry Stiner, born around 1843 in Claiborne County Tennesse. He enlisted as a Private to fight for the Union in Company E, 2nd Tennessee (Mounted) Infantry on June 1st, 1863 at Somerset Kentucky.
 In July 1863 the Regiment was part of a force chasing General John Hunt Morgan through Kentucky, Indiana, and Ohio. In August the XXIII Corps was reorganized for the invasion of Eastern Tennessee and the Regiment was placed in General Shackelford's 3rd Brigade, of General S. P. Carter's 4th Division of Cavalry. After several skirmishes in Eastern Tennessee the majority of the Regiment was captured at the battle of Rogersville on November 6th, 1864 when they were were surrounded and captured by the 4th Kentucky Cavalry (CSA). Casualties for the regiment were 5 killed, 1 wounded, 20 officers and 474 men captured. The prisoners were sent to either Andersonville prison, or Libby prison.
 William Henry Stiner arrived at Andersonville on February 18th, 1864 and was admitted to the prison hospital on April 7th, 1864. He died of smallpox on April 28th, 1864. He was approximately 22 years old. Here is his casualty sheet from Andersonville.
 And here is a photograph of his tombstone from the prison.
 Thanks to my relative Mary Lynn for doing 99% of the research on this and producing a wonderful book of Stiner geneology. Also, some information was taken from http://www.tngenweb.org/civilwar/usainf/usa2inf.html.
 After the museum we walked the battlefield for about 2-3 hours. The battle was fought on October 8th, so we were just a few weeks off. And it was also fought during a drought, which we are currently enjoying in Kentucky. With those two factors it was easy to imagine that what we were looking at was close to how the battlefield appeared in 1862 when the battle was fought. Click the pictures for full size images.
 It is covered by worm fences. They may be a little short, but they were cool to look at. One thing that stuck out is how the wood weathered into a gray color. I guess I need to repaint some of mine that are brown...
 The biggest terrain feature for the battlefield is that it is just a huge series of hills and slopes. It must have been mentally exhausting for the Confederates to push the Union soldiers back in the early part of the battle, just to see them fall back and reform on the next hill! This happened several times and just walking the path of the assault was a little tiring.
 One of my favorite parts of the battlefield the Open Knob, now called Parson's Ridge, named for the Lieutent who defended it with an 8 gun Battery before being overrun by men from Cheatham's Division.
 Here is the view of the ridge from behind the marker.
 Here is the view of the ridge from behind the fence line that the Confederates stopped briefly behind, before their assault up the hill.
 Jaret wanting to "charge" up the hill. It was actually a very educational experiment. He struggled with 12 year old energy and tennis shoes! It made us appreciate the Confederates who made the charge in wool uniforms with heavy equipment.
 This is the view from the crest of the ridge. It is terrifying to imagine what it must have been like to charge up that ridge into the fire from all 8 guns, plus the crossfire from the Brigade of Infantry that was supporting it.
 The retreating Union soldiers moved through what was at the time a cornfield.
 The attack continued West to the position of Starkweather's Brigade, supported by 12 guns. It's interesting that every time the Confederates were able to push the Union off of a position, they went down the back side, and then up the next hill and reformed on the new high ground.
 We found this halfway up what is now known as Starkweather's Hill. Battlefield relic or discarded garbage?
 Another view from Starkweather's position.
 This picture and the next few are just a few random pictures showing the general landscape and feel of the battlefield. I didn't keep really good notes and to be honest a lot of the pictures are always mixing together in my mind. I'm planning on another trip in the next few months and I'll try to get some good pictures of another part of the battlefield. We really only covered a small portion of it, and there is a lot left to explore.

 The path of attack for the Confederate center...

 That's all for now, thanks for looking!
 My Mom and two of my brothers visited from Ohio this weekend so I took the boys to Perryville. Here are a few of the pictures I took in the museum. Click the images to see full size versions. I apologize for the lighting and blurriness, I had to turn my flash off and it messes with my camera's zoom.
 Here is the outside, nothing too impressive but really nice on the inside!
 Here are a few of the exhibits, I didn't get pictures of everything, just a few of the basic things and whatever caught my eye or was unique.
 I wish I would have taken the time to read all of these, there was just so much stuff that you just had to skip over some of it just so we could get out to the battlefield! (And we also watched a 28 minute documentary about the battle that they had playing)
 One of two original flags- you can see part of the other one in the next picture.
 Really cool 6 pounder.
 And a side view.
 I thought this was interesting...
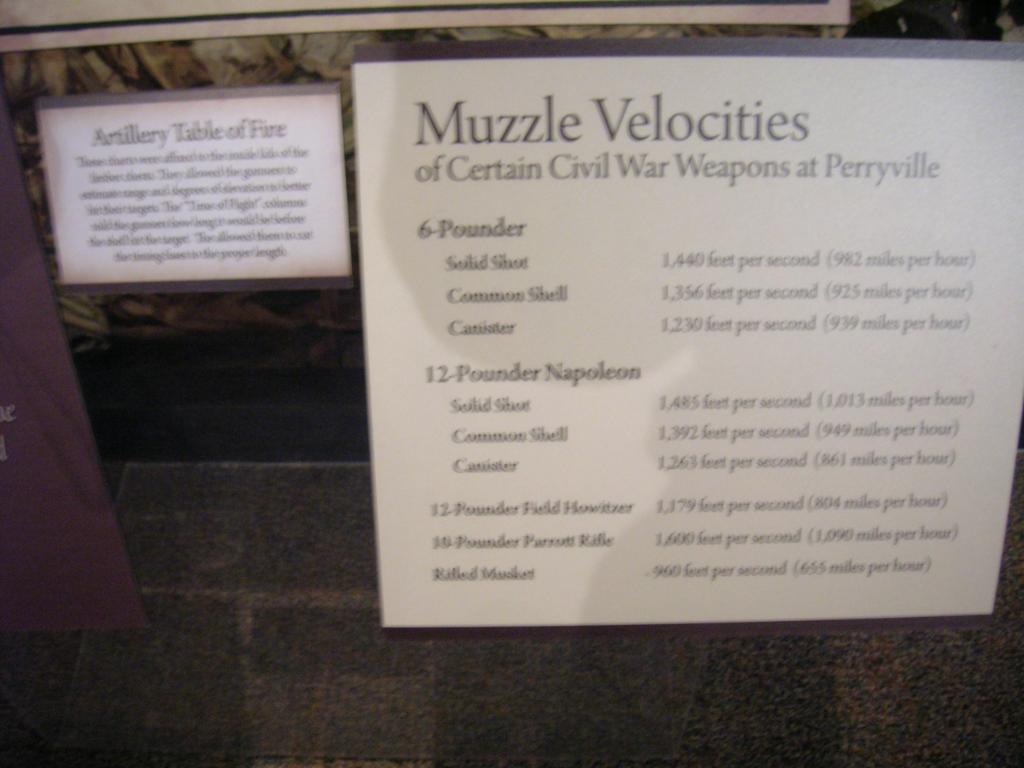 ...And also this!
 Here is the right half of one of the weapon displays.
 And the other half. I tried to get close ups of a lot of these but when I uploaded the pictures I found out that almost all of them were blurry...
 Oh, how I'd like to break the glass and take this home!
 They had quite a few canteens, a few that were confirmed from the battle too. I took a picture of this because of the red strap, I will now have to paint one of my canteen straps red!
 This was kind of unique.
 It's only fitting that I post this here, given that we share a name.
 Is it a little disconcerting to anyone else that he referred to the war as "the game"?
 Here's Jaret with the 6 pounder. Like a kid in a candy store!
 And last but not least- Jordan.


